


4 days ago Github switched to usage-based billing. It was about time because Microsoft didn’t get to be one of the largest companies in the world by running a charity!
Fortunately, we don’t have to comply because local models have come a long way. In this post, I’ll share:
How to run local models (and a free cloud based alternative)
How to configure your agents (Copilot and Pi)?
A simple demo app to showcase the power of local models
Disclaimer: No AI is used in this entire article.

Quick intro
I’ve been specializing in local models since 3 years ago, primarily due to cost (developing an AI-powered app), but also due to privacy and personal obsession with hardware. Taming the smaller models is much harder but once you master it, you can take better advantage of the larger ones.
An NVIDIA RTX, Apple M4 and AMD ROCm later, I’ve tried Llama.cpp, Ollama, LM Studio, and Jan in Linux, Mac and Windows. So I thought I’m in a good position to share what I’ve learned over the last 3 years hoping to shorten your journey.
Note: if you already know how to run LLMs locally and connect them to your coding tool with acceptable results, this article is not for you. I have other articles about AI which you might find interesting:


The price bump
Github used to operate with a credit model and even had some free models. Now even those free models aren’t free anymore:
Github shared some points on optimizing your AI credit usage.
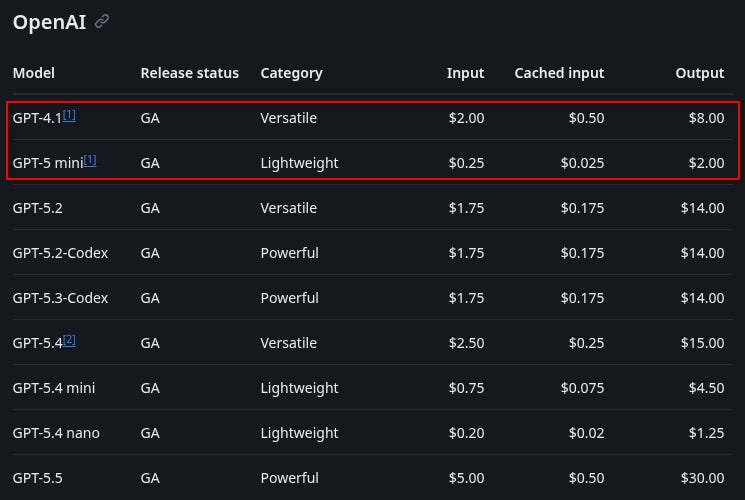
The price bump is more obvious for Github because it’s a token reseller. Flagship models are introduced with significant price hike, even though their performance isn’t improved at the same pace.
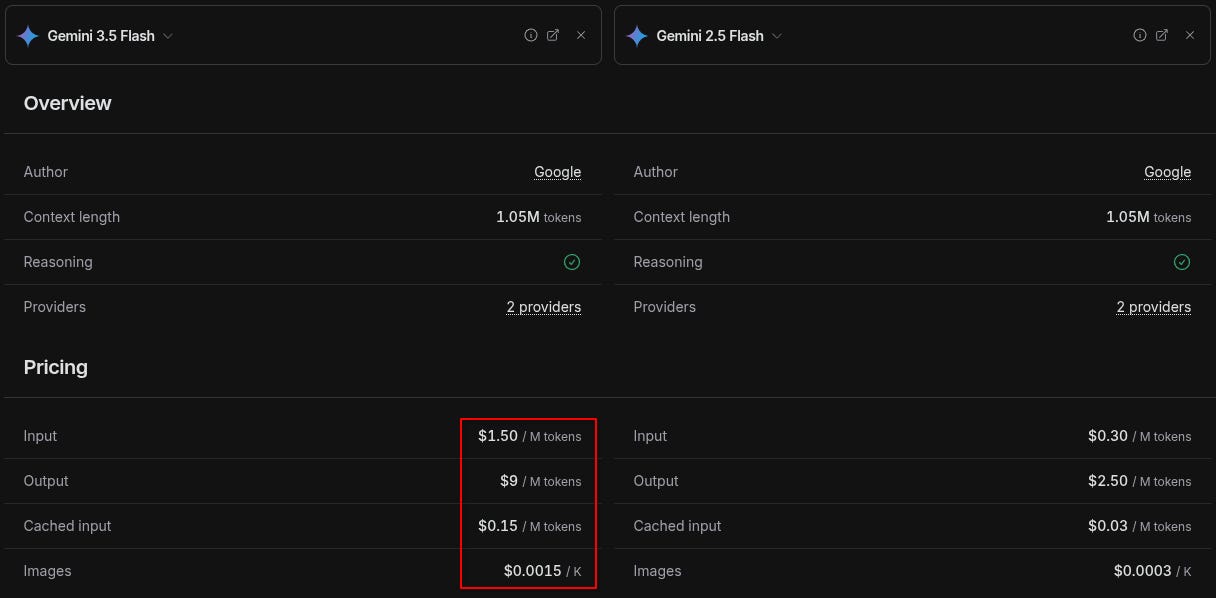
Google Flash 3.5 is +3x more expensive than Flash 2.5:
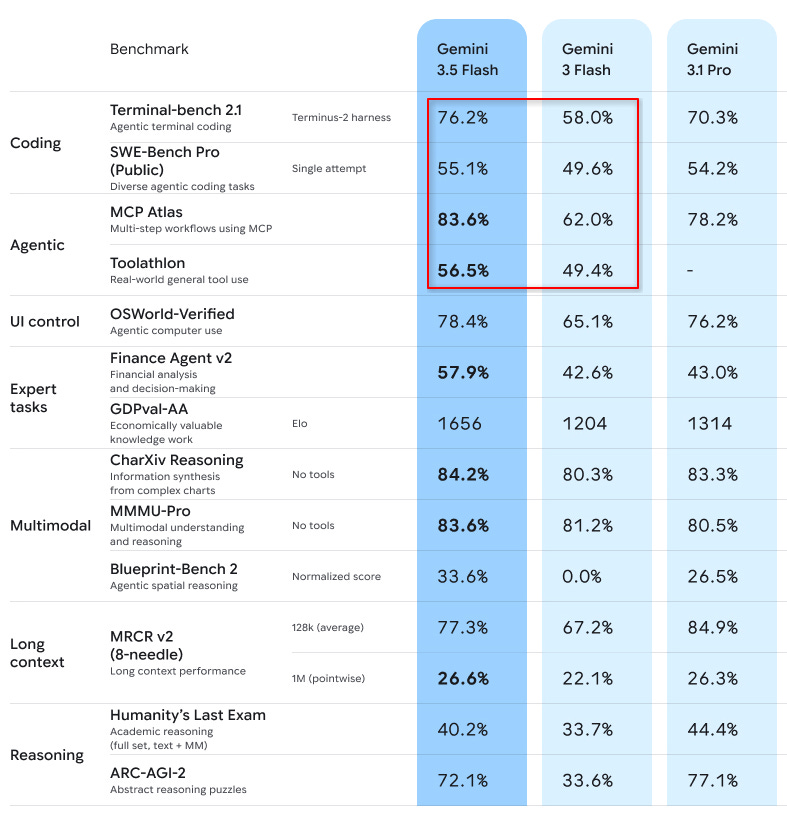
So 3x more expensive, but how much better is it? Here’s Google’s own benchmark:
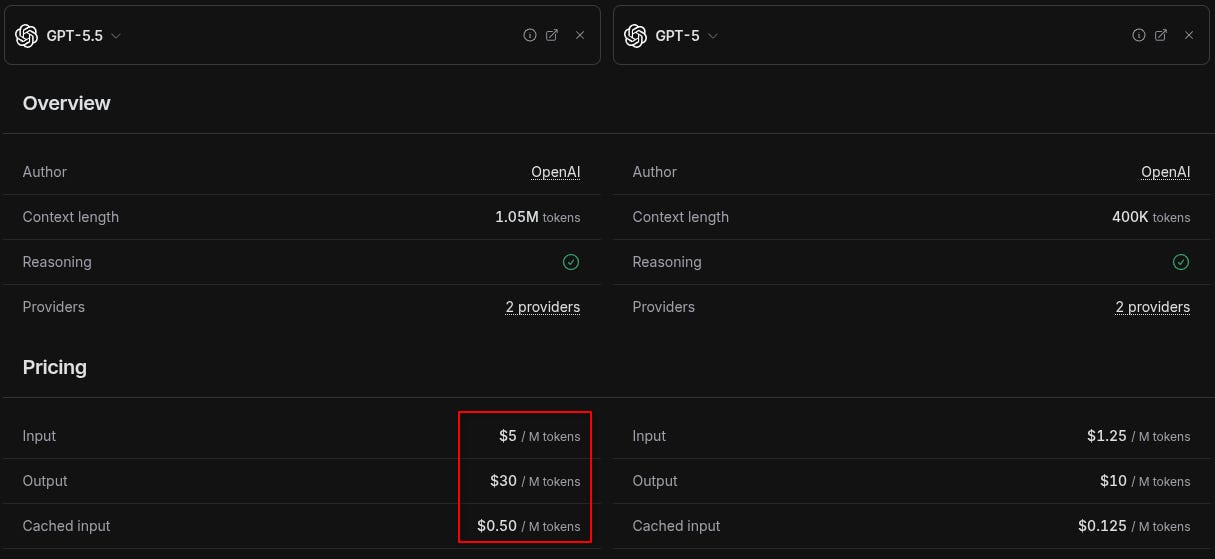
GPT 5.5 is +3x more expensive than 5:
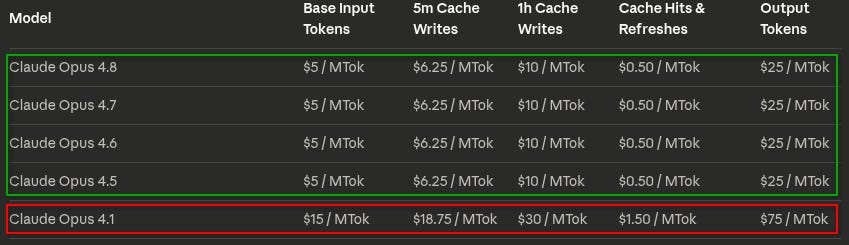
And Claude? Claude was already too expensive so they adjusted down! 😉
Local models?
It's true that local models do not match the performance of SOTA (state of the art) models like Claude, GPT or Gemini but there are some nuances:
The price/performance ratio: state of the art cloud models are exponentially more expensive for their perf improvement.
Deterministic harness: You can improve the quality of a weaker model up to 6x using better tooling, instructions, etc. Cloud models outperform local models in their raw form but with tooling (e.g. an AI harness) you can compensate a lot.
The benchmark fallacy: benchmarks can be deceiving. It's extremely hard to quantify something as complex as a model down to a scalar number. Benchmarks may represent expected tasks and common requirements but those aren’t your tasks or requirements. Plus, every AI lab focuses on the benchmark that makes their models look good. You have to try the model for your own workload to assess it realistically.
Geopolitics effect: What the American AI labs are willing to expose for free isn't their best work. gpt-oss-20b is too old. Anthropic hasn't released anything open weight. Gemma 4 is the only serious model in this league. But we gotta thank the Chinese labs which in an effort to neutralize US investment and big bet on AI, release very capable models like Qwen, Kimi, GLM, etc.
Then it's the brain rot phenomenon:
Weaker models are better for the brain because you have to compensate their lack of intelligence and be more involved. It’s a bit like riding a bike while others take the car. Is it slower? Yes. Is it better for your health? Also yes! For knowledge work brain is the most important organ to keep in shape. Sometimes “slow is fast”.
Our goal is not to maximize automation and offload our thinking to the machine. That would be a blunt confession that our job is automatable.
Don’t sacrifice your future relevance for short term velocity just because your boss asked you to.Many methods that help you tame an weaker model also apply to larger ones. Taming a weaker model is like playing in hard mode. Once you know how to do it, you can use the big tools much more effectively. These models are now commodity.
Also, if you're thinking that state of the art models make you 100x more impactful, think again. They do multiply your output for sure, but the impact always ties to values and those values come from the humans.
Offloading impact to AI is risky business, but also low effort. If you do what everyone else is doing, you're gonna get the results that are average.
Enough with ethics! Let’s get to the engineering stuff.
Which model?
There are many models depending on what you want to do. For coding, the Chinese models are generally at the top of the Huggingface leaderboard.
This is an area which is evolving very fast so I’d be careful about being too prescriptive but there are Qwen, DeepSeek, Kimi, Llama, and Gemma (among others).
Gemma 4
I find Gemma 4 models to be quite good.
Gemma 4 has multiple version:
E2B: The “E” stands for edge (we’ve covered edge AI before). This is a 2B parameter version which is tiny enough to run on most hardware but has a higher risk of hallucination or just giving up without completing the task.
E4B: same as E2B but double the size. I don’t want to pull benchmarks to prove that it’s twice as useful because its usefulness depends on your tasks and environment. This is the version I started with, before using the next one. I’d recommend starting with E4B because it’s cheaper to download and configure.
12B: I don’t know why they dropped the “E” to be honest, but whatever! This version is quite unique because it natively understands images unlike the other models that have a decoder inside. This is an implementation detail but for us, this means 12B is faster for front-end or visual coding where you may need to send pictures to the model. It also has native audio support but that’s not important for coding workloads.
26B A4B: once you learn how to read these seemingly random alphanumeric names, this one is actually my favorite. It has 26B parameters, but only 4B are active at a given time. It’s smarter than the plain E4B version but still fits into a common graphic card with 8-12GB VRAM. The way it achieves this feat is the a MoE (mixture of experts) architecture. We’ve covered MoE and MoA before. So the 26B contains all those experts, but only a few of them are active depending on the task.
31B: this is Google’s largest open weight model. It’s not an MoE, so you need a lot of VRAM to run it. I haven’t tried it because the 26B MoE model does a pretty decent job and even though my AMD APU runs it, the speed is unworkable (1-2 TPS).
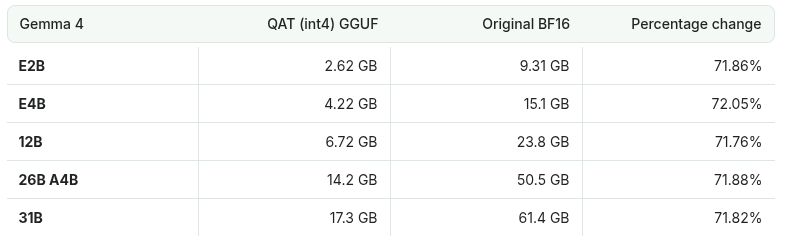
If you want to go with Gemma, you can use the QAT variations (e.g. E4B QAT) which require less memory but retail almost the same quality.
Also Unsloth has done some extra work on top of the vanilla Google models to make them even more efficient:
How to run local models?
We need to build a language so the rest of the article doesn’t look like jargon soup.
You probably already know many of these so feel free to skim through:
Deep learning: up until a decade ago NN (neural network) was limited to just a few layers. Deep learning is about efficiently increasing those layers while getting meaningful improvement. When you download a model to run on your machine, you’re downloading the weights in the neural network, plus some architecture-dependent extras.
Attention mechanism: was the key to unlock language models that could pass the basic version of Turing tests (basically it’s hard to distinguish whether a conversation is computer generated or comes from a human).
LLM: is the subset of “AI” that we’re interested in because it can generate computer code. There are other AI that generate images, videos, etc. But they’re outside our scope because we’re trying to find an alternative to run code locally.
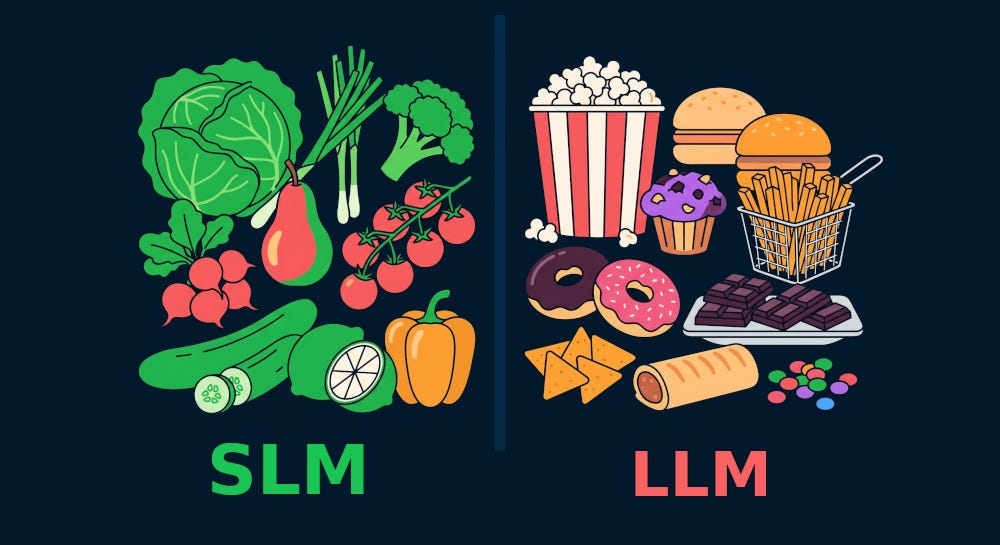
SLM: small language models are similar to LLMs but are small enough to fit in a consumer grade GPU. Which model you can run varies but there are SLMs as small as 0.27B although for any meaningful coding workload, you probably want to run at least a 4B model. I wouldn’t be surprised if the Chinese labs lower this requirement in an effort to neutralize US investment and big bet on AI but let’s stay clear from politics.
Huggingface: it’s like Github for models. If Github is for code, Huggingface is where you can find models which are massive files containing model weights. And just like we have open source for code, we have open weights for models which have their weights publicly accessible. Of course there are licenses governing where and how you’re allowed to use a model, just like code.
Inference: the process of generating new tokens (e.g. code or human readable text)
CPU/GPU/TPU/NPU: this is the hardware that runs the model:
CPU: Central Processing Unit was traditionally used to run ML (machine learning) workloads but due to its generalist nature, it was too slow and energy inefficient.
GPU: Graphics Processing Unit. Thanks to projects like AlexNet people started using GPUs for massive matrix math which is perfect for the current generation of AI workload. NVIDIA which was previously known for its gaming GPUs suddenly found itself in a hot place to market itself as the “leader of accelerated computing”. In the context of GPU, VRAM (video random access memory) is a key parameter because it decides how large model you can run.
TPU: Tensor Processing Unit is Google’s specialized chip for matrix operation (more accurately, matrix is 2D while tensor is a super-set that can have any dimension). Unless you have server class hardware, I’m not aware of a TPU for consumer-grade hardware.
NPU: Neural Processing Unit is common in newer computers (often go with Copilot+ branding) that specializes in quick and light AI workload like noise removal or background replacement efficiently. For LLM workload, NPU support is poor so we’ll stick to other hardware types.
APU: Accelerated Processing Unit, which is primarily used by AMD to describe their CPU+GPU units which share the same RAM in what’s called UMA (unified memory architecture).
Apple Silicon: M1, M2, etc. processors. This is Apple’s own processor with an excellent performance and efficiency for AI workloads. If you have an Apple Silicon processor (e.g. M4, M5), your ordinary RAM is shared between your CPU and GPU in what’s called UMA (unified memory architecture).
Funny observation: I noticed I’m formatting this post exactly like an AI-generated text with bullet points! 😄 I promise it’s all organic, but I guess I’ve used too much AI content? Or maybe AI is fed too much well formatted text?
Requirements
Note: if your hardware isn’t good enough, there’s still a way to run free models from OpenRouter. You can skip this section.
To run a local model, you need a few things:
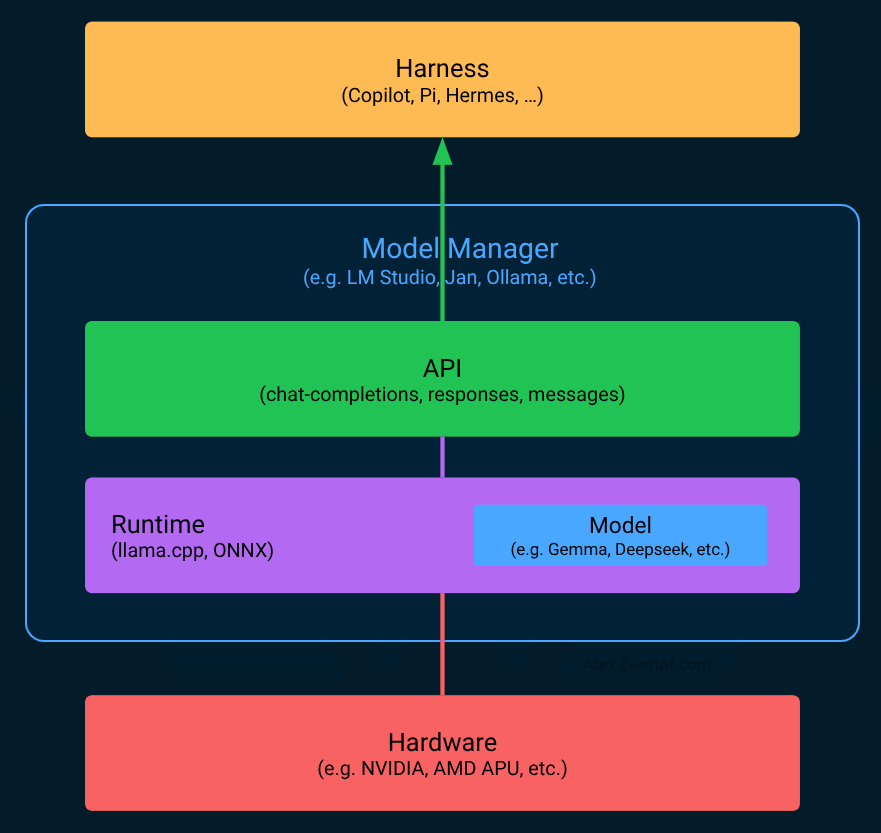
Harness: I have a separate article for internal architecture and features of harness. In the context of this article, the VS Code Copilot, or Copilot CLI or Pi are the harness. They use deterministic components (traditional code), around the model (stochastic component).
Model: these are usually massive files containing the deep neural network weights. There are different model quantizations (e.g. Q8, Q4) which are, roughly speaking, like different image resolutions. Then there are different formats (e.g. GGUF, MLX) depending on your runtime. You just need to figure out what fits in your hardware but tools like LM Studio make it easier.
Runtime (also known as inference engine): this is what runs the model and emits tokens. There are a few options each with their own format:
LLama.cpp: The most popular open source runtime. It has nothing to do with Llama (the open weight model from Meta). This can load GGUF or MLX model formats. LM Studio uses Llama.cpp under the hood.
MLX: Apple’s runtime. If you have a Mac with M1, M2, etc. processor, you’ll be using this. When running Llama.cpp on Apple Silicon, it can use MLX under the hood.
ONNX Runtime: this is what’s behind transformers.js for running LLMs in the browser using WebGPU for example. But it can also run on mobile devices (iOS, Android). The model format is ONNX.
vLLM: is another open source option that came out of UC Berkley. It’s primarily used on beefier servers and a bit harder to set up.
Model manager: this part is optional but highly recommended for a smooth start. It abstracts away the hardware and runtime while offering you a nice interface to find, download, configure, load and try different models. An important feature is an OpenAI compatible API. This is important because many AI applications (like harnesses or model agnostic AI applications) work with that de-facto standard.
For model management, you have a few options:
Ollama: started as a terminal CLI but now it has a lightweight GUI too. Again it has nothing to do with LLaMA (from Meta) or Llama.cpp (the runtime) other than it’s a Go wrapper around the latter C++ project. Open source.
LM Studio: free but not open source! It has more bells and whistles plus its own SDK (Python/TypeScript) and a REST API on top of extra REST API that allows you to control aspects that are unique to local models (like loading them dynamically).
Jan: a free AND open source alternative very similar to LM Studio but not as feature-rich.
Just be aware that model managers like LM Studio sometimes lag behind the latest runtime development. Personally, I’m more of a GUI person, so I preder LM Studio.
Model manager is not required. I started running Llama.cpp in a container. Llama.cpp also offers an OpenAI-compatible API and even comes with its own web based chat interface. As the community develops these tools, the line between the runtime and model manager becomes blurry.
If you decide to go the llama.cpp route, you probably know how to find and download models but I just quickly mention it:
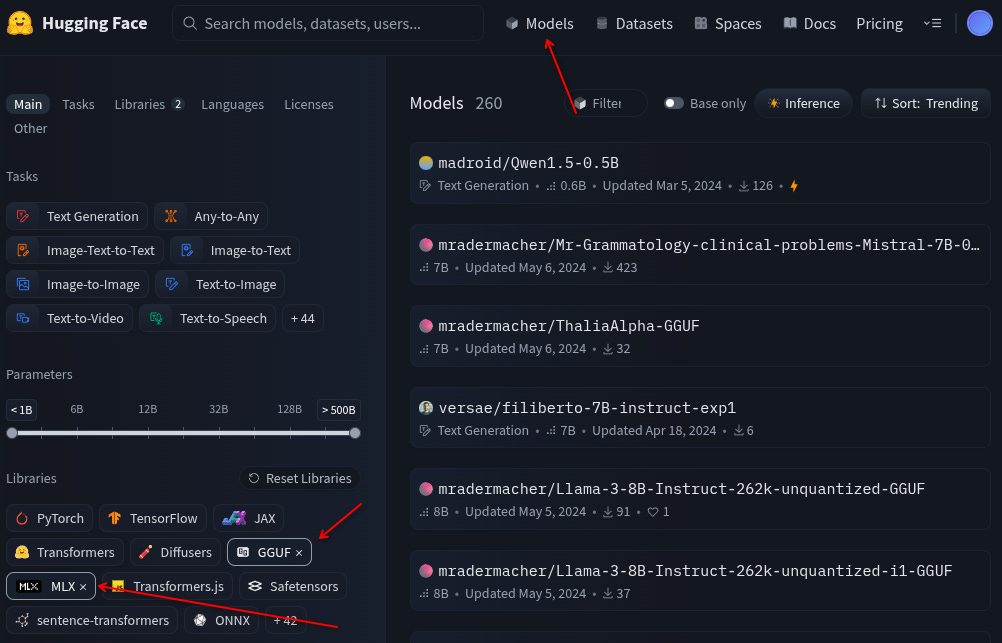
Go to Huggingface and click on Models in the top header.
Then filter the models for GGUF format (because that’s what Llama.cpp expects) and/or MLX if you’re running on Apple Silicon.
Search for the model you want (if you don’t know what you want, read on).
An advantage of using LM Studio is that you don’t have to go to Huggingface to find the model and figure out what fits on your hardware. Also many of these models come pre-configured, so you don’t have to spend time tweaking the settings.
Let’s see that in action!
Selecting a model
You need LM Studio 0.4.15+ (download here) for the following instructions:
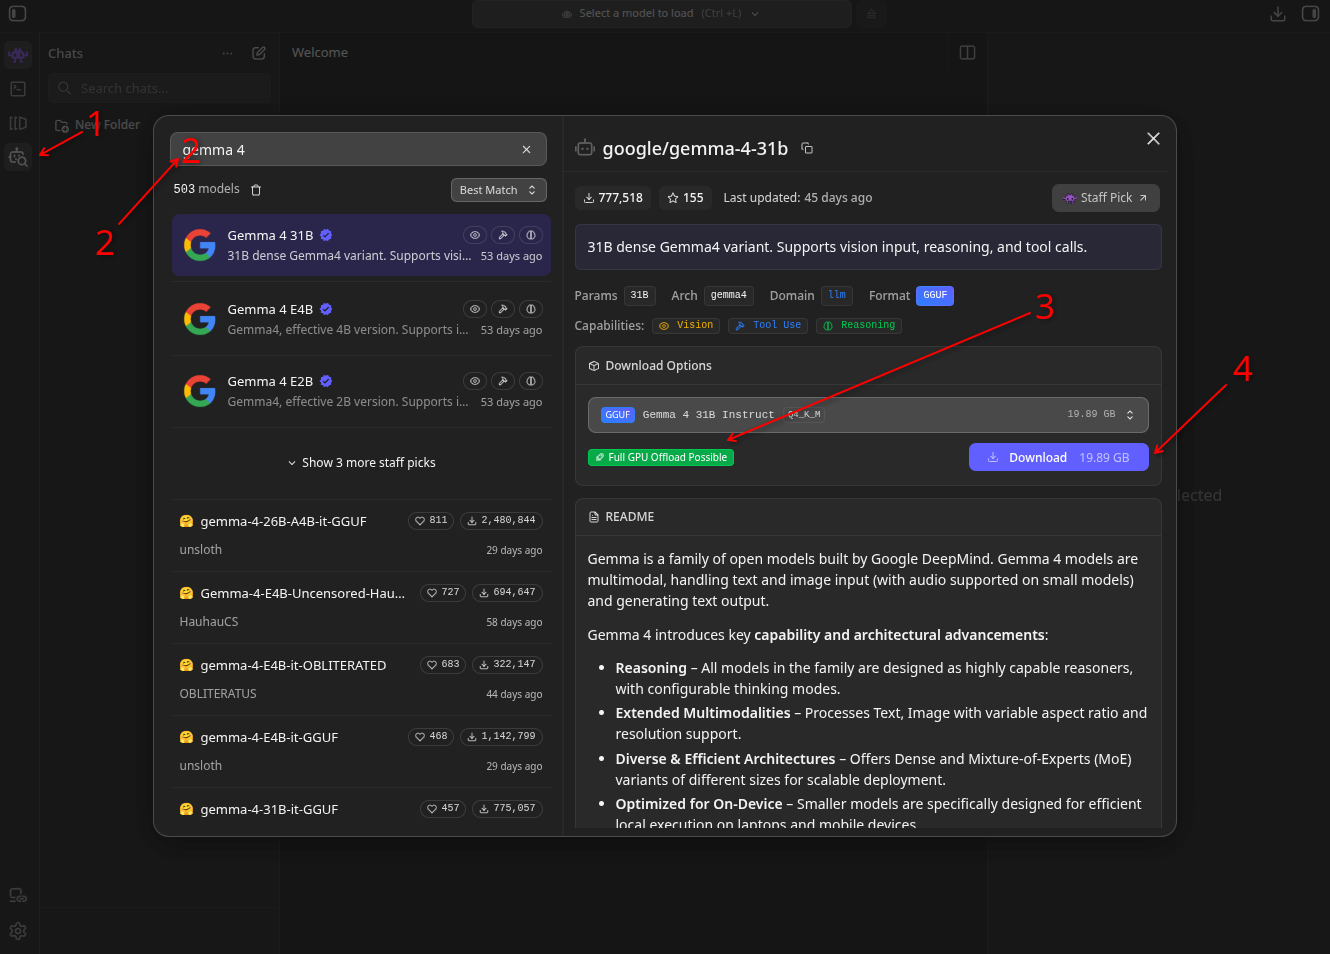
Click on the Model Search button on the left
Type the name of the model you want (read below)
Make sure it fits in your VRAM (hopefully you see a green or gray text here but red is a no-go).
Download: obviously you need enough space and a internet bandwidth.
Which model to download? There are many models. Personally, I recommend Gemma 4 but that’s because I’ve played with it the most lately.
Previously I’ve tried DeepSeek and Llama. I think Gemma 4 strikes a good balance between general workload (e.g. planning, discovery) and code generation specialty. It also has a few capabilities that are key to running it in VS Code:
Tools Use: this is non-negotiable as any agentic workload requires using tools which encapsulate bash, MCP or general harness functionalities like file editing.
Vision: comes in handy for pasting screenshots
Reasoning: huge plus for coding tasks
The raw model may not look too smart when chatting with it, but when it’s put in a harness with guardrails, skills, and tools, it can do much more.
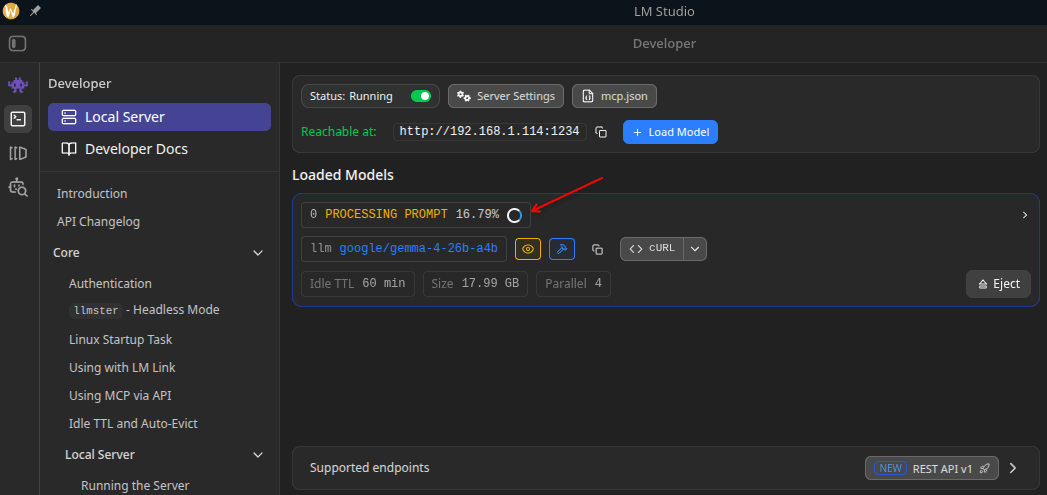
Setting up the server
Before configuring Copilot to use local models, we first need to set up the server. As I said before, llama-server does the job but llama.cpp isn’t beginner friendly. So we’ll be using LM Studio:
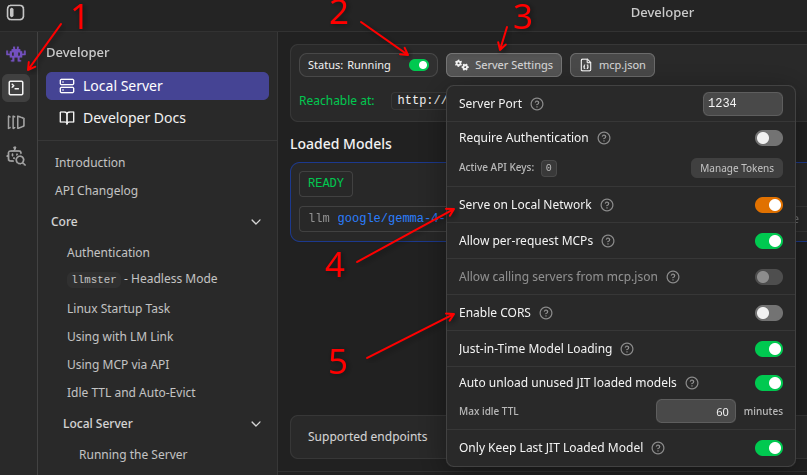
Click on the “Developer” button on the left side bar
Start the server with that toggle
Optionally adjust the server settings. A couple of interesting ones:
Serve on Local Network: use this if you’re running the LLM in a different machine than where your VS Code is running (or if you’re running it in a Podman/Docker container)
Enable CORS: if you want to access the model from a web application. We won’t need that for VS Code but I’m just mentioning it because you can technically use the same server for any app that requires an LLM API endpoint and token. Speaking of the token, you see the “Manage Tokens” button where you can generate some. I don’t require tokens in my setup but if you’re running a dedicated server accessible to other computers, you may want to put a token as an extra layer of security.
Before we go, I need to mention a few important points that I learned by mistake:
When you just start the server, usually no model is loaded:

That’s because LM Studio lazy loads the model when a request is made (you have to download the model first of course). This is called JIT (Just In Time) loading.
You can also control how long the model is in memory before freeing up your memory (in case there are no more requests). This is the TTL (Time To Live) setting:
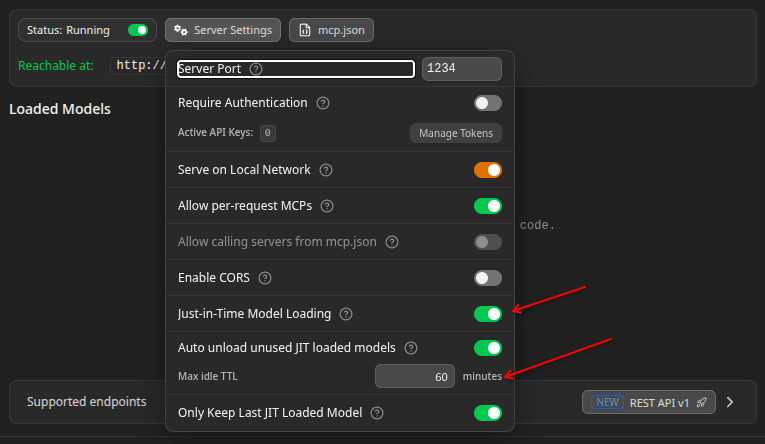
Cold start: JIT means if the model isn’t loaded, the first request is going to take extra time (around 10-30 seconds). It’s a bit like cold-start in AWS Lambda. Once the model is loaded, the subsequent requests are faster, but if you have a timeout, you need to either account for the cold-start or manually load the model beforehand. The metric that’ll be impacted is TTFT (Time To First Token). On the plus side, LM Studio can dynamically load the model that is in the request. This way it can pretend to be a server that runs multiple models simultaneously.
Short context window: There’s a more important catch though: when LM Studio loads a model, it uses some default settings. And these settings are important because by default, your context window may be as little as 4k!!! To put that into perspective, most models in VS Code Copilot have 200-400k context window. We need to increase the context window manually in LM Studio.
If you’re coming from cloud AI world, these settings may be new so let’s quickly go through them before taking about VS Code setup:
Click the “Load” button to see the list of the models you have downloaded.
Here are mine:
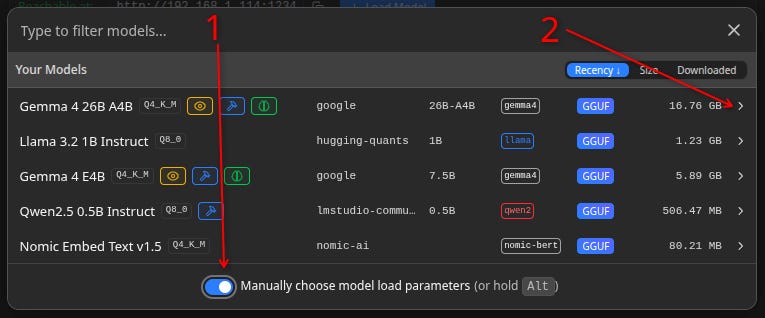
Toggle the “Manually…” switch.
Press that arrow button at the end of the model row to see the advanced settings.
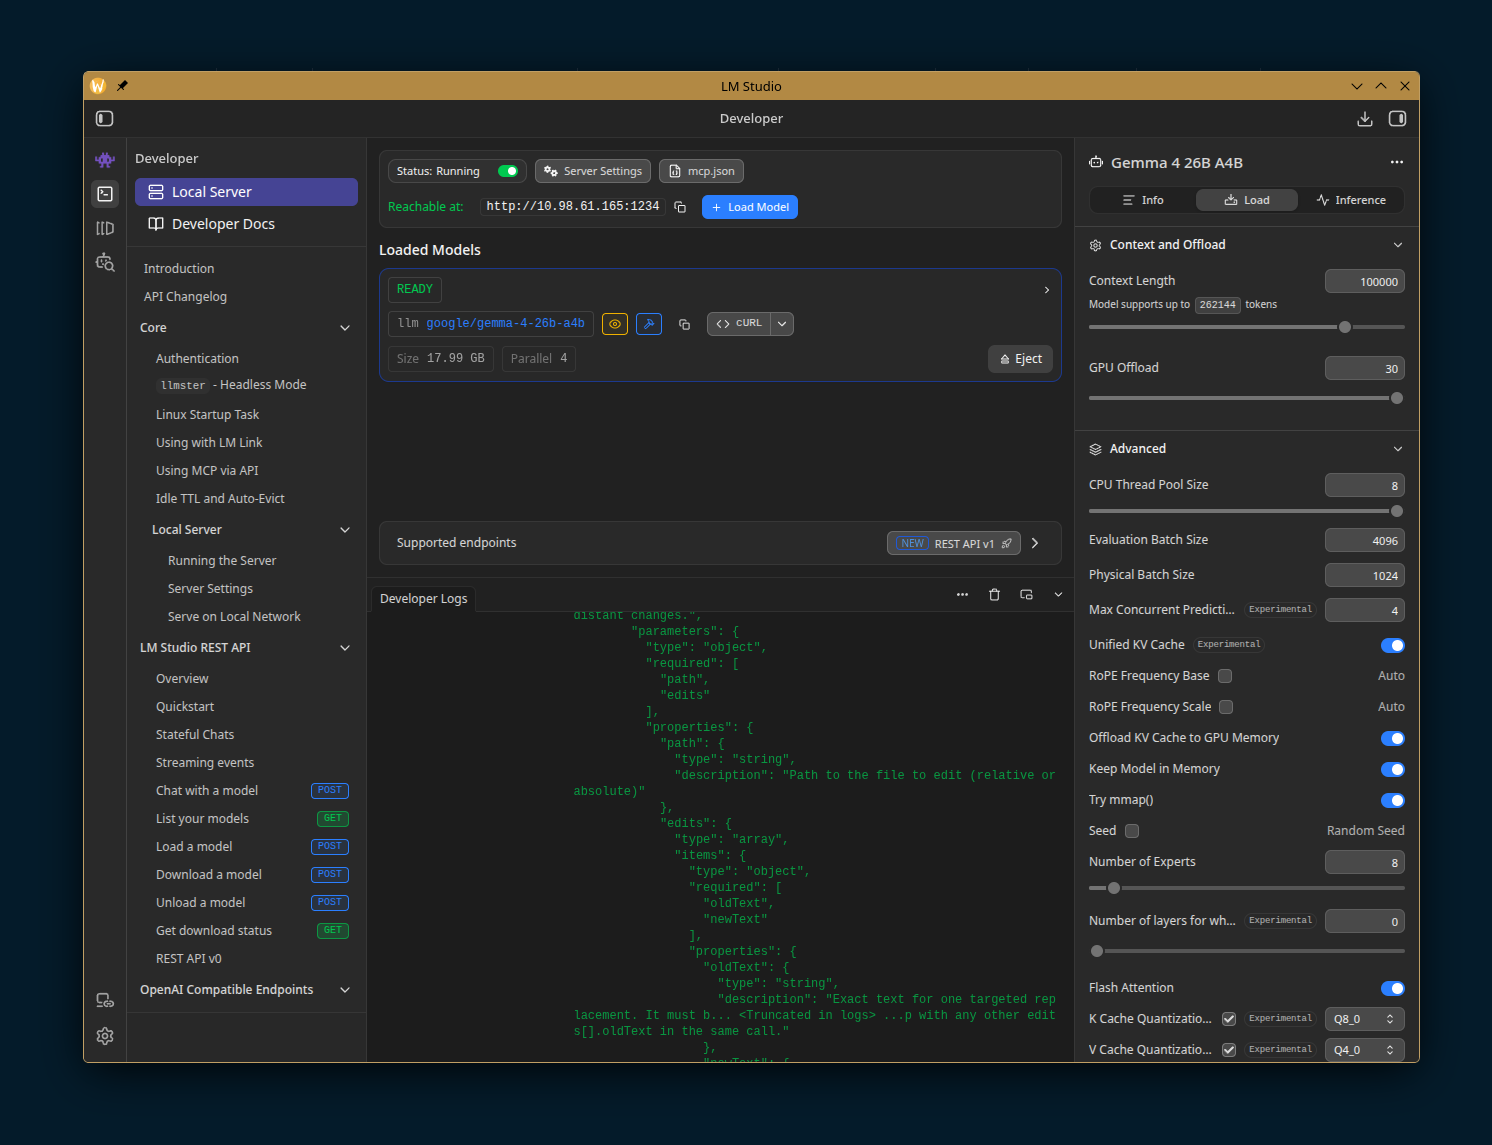
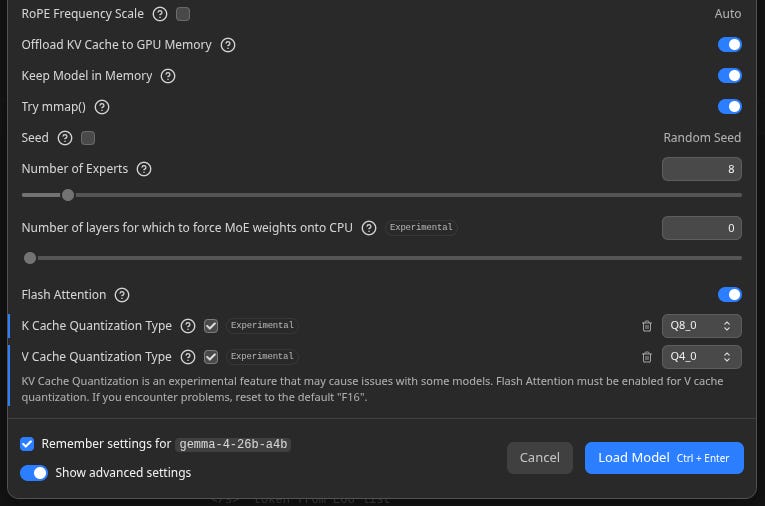
Here are the settings for Gemma 4 26B with important aspects numbered:
Legend:
How much memory is required for this particular config
Total number of tokens (input and output) that fits in the model’s attention span
How many layers of the deep neural network to run on GPU
How many CPU threads should be used. Don’t max it out or your computer will slow down while AI workload is in progress.
Enable flash attention
Quantization of key cache
Quantization of value cache
Saving these settings is crucial, otherwise LM Studio falls back to defaults on the next model load
OK, that’s a lot of jargon! Let’s dive in.
For the most part, you don’t have to tweak these except the Context Length slider. As you play around with it, you may notice that the number in front of GPU changes (top right). That’s how much RAM will be consumed in different settings. Here are some numbers:
Context Length = 262144 (max), VRAM required = 25.74
Context Length = 4096 (default), VRAM required = 18.16
Context Length = 150000 (my preference), VRAM required = 22.45
We’ll be covering a couple of tricks shortly but you have to experiment with different values to see what works on your specific hardware.
In my experience if you can’t load a model with at least 100k tokens, it’ll be hard to use it for coding in VS Code Copilot because just the system prompt occupies 20-40k tokens (depending on project).
You can’t go for too large context window either (e.g. max it out) because as the context usage grows, the token generation speed goes down. The sweet spot is where your harness automatically compresses the context as soon as the context utilization hurts performance.
Those with the sharp eyes may notice that there are 3 different configs at play:
LM Studio lets you define Context Length: this is the total number of tokens that fit in the model’s attention span. We call it
C.maxInputTokens: Maximum number of input tokens the model accepts. Smaller numbers mean the context compression kicks in more aggressively. We call it I.maxOutputTokensMaximum number of output tokens the model generates. Smaller number means the model will be more limited in how to respond your queries. We call it O.
Context length (C) is the hard ceiling for input (I) and output (O) tokens:
I couldn’t find any official documentation from VS Code mentioning preferred values for maxInputTokens or maxOutputTokens. I usually go for 100k/50k bringing the context length to 150k.
If your machine cannot run a decent model, don’t give up. There’s a free workaround that I’ll cover in the end.
Before we dig the rest of the settings menu, I just need to mention that ideally you want all model layers to run on the GPU. See that “GPU Offload” slider (3)? Max it if you can.
It is possible to run some layers of the deep neural network on CPU (4) but this requires copying data between CPU and GPU on most hardware (Apple Silicon is the only exception to my knowledge, because of its UMA).
OK, enough hardware jargon. Let’s go to the trick:
Set K Cache Quantization Type to
Q8_0Set V Cache Quantization Type to
Q4_0
Why these exact numbers? Magic! 😉 Just joking!
Quantization here refers to tweaking how the KV cache (the LLM’s attention mechanism) uses the memory. Just like when you’re downloading a model, you can think of it as “resolution”.

We want higher resolution for keys than values. These exact numbers came out of a conversation with Gemini Pro where I described my setup and got tips. I haven’t tried all different combination but this particular setup reduced the GPU memory requirement from 28.75GB (default) to 22.45GB so it matters!
The most important part for this config frenzy is to save it:

You want LM Studio to remember these settings next time this model is requested via the REST API because VS Code Copilot has no notion of requesting a custom context window length or other options that are specific to local-models! It’s primarily built for cloud AI.
💭 Theoretically LM Studio could support that using custom headers that replicate what it already supports in the POST /api/v1/models/load endpoint. VS Code supports adding custom headers to the model config. That way, we don’t have to duplicate the config between LM Studio and agent harnesses that use it.
We’re mostly done. Just a tiny tip: you can go to the chat window in LM Studio and try the settings you just tweaked. Without a harness, the model is going to be pretty dumb. Don’t be disappointed. Our goal here is to check the TPS (token per second).
If the TPS performance is below 10, it’ll be painfully slow for coding purposes. You’ll spend more time waiting for the model than getting meaningful work done. And time is money.
Setting up Copilot Custom Endpoint
Finally the part you were waiting for! Although we’ll be covering the GUI version. The setup for Copilot CLI is different.
Note: you need the latest VS Code version which is 1.122.1 at the time of writing (it came out a week ago).
In the Copilot chat window:
Click on the model selector (next to the Agent button)
Then click on the gear icon
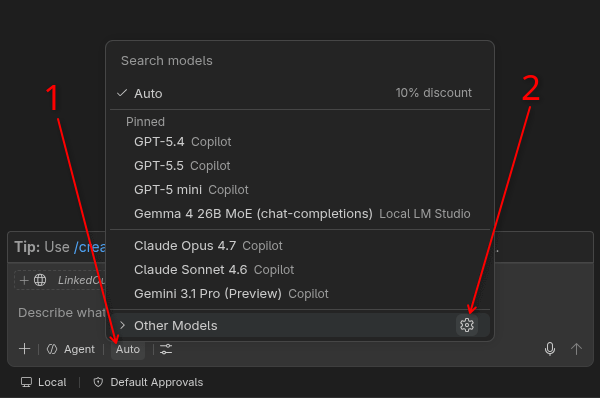
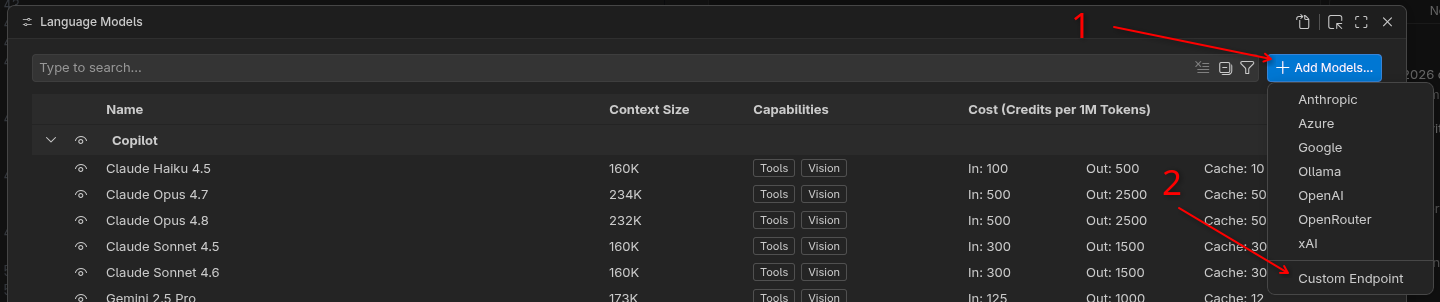
This opens the “Language Model” dialog:
Click on “Add Models”
Click on Custom Endpoint (if you chose to run Ollama, you can see a dedicated option for that one)
Then a tiny input box emerges at the top center!
Give it a name like “Local LM Studio”.
Enter the API Key in case you set one when you configured LM Studio server above. If you didn’t set one, just press enter.
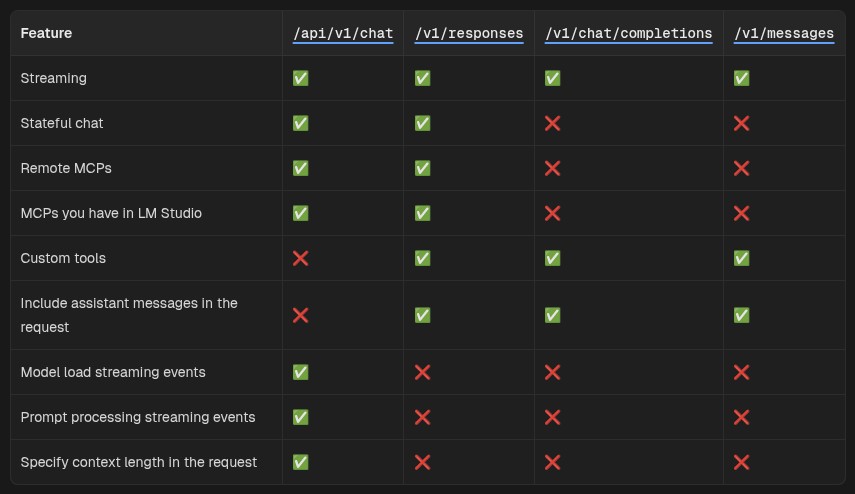
Choose the shape of the inference API endpoint. There are 3 types of APIs. In my tests only the Chat Completions worked smoothly.
LM Studio supports 4 endpoints. You can read about the different options here.
Since VS Code is primarily built for cloud AI, there are a couple more steps that we need to take in order to make it fully workable. Click the cogwheel icon in front of the “Local LM Studio” entry you just added and open the settings in JSON:
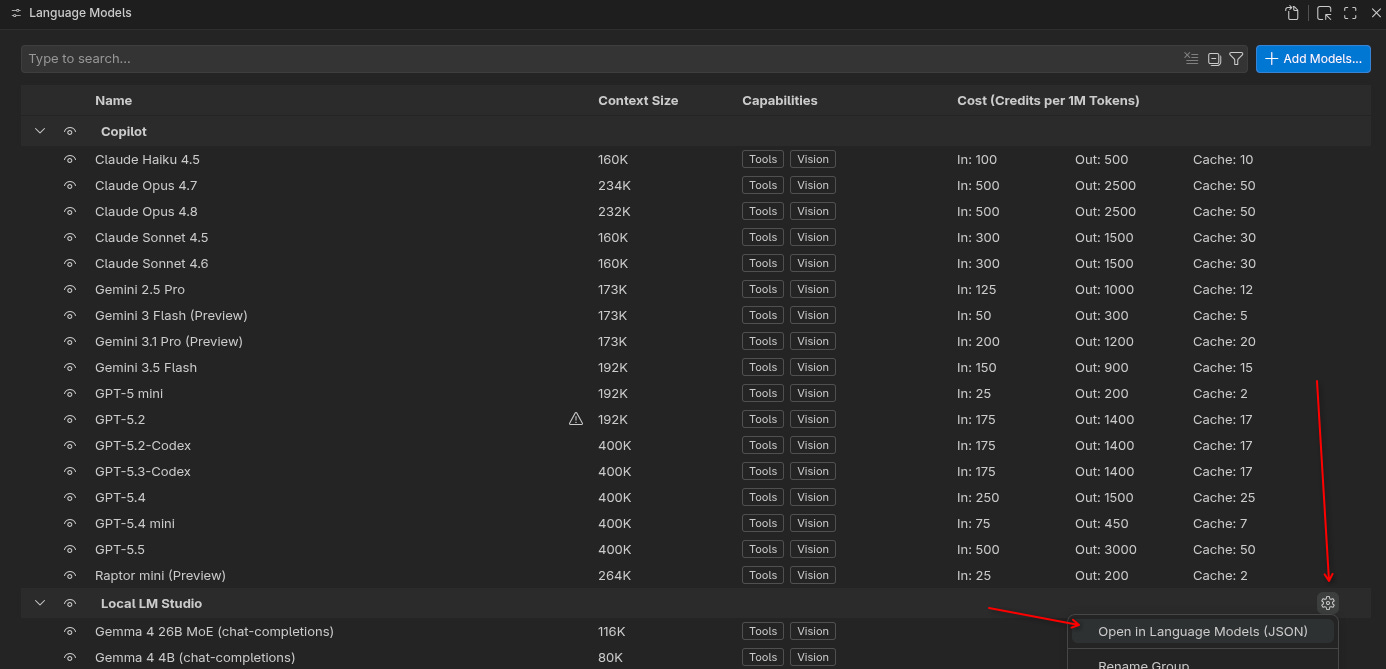
Then manually set the url, maxInputTokens, maxOutputTokens, and other parameters.
Here’s my settings for both the 4B and A4B (MoE) versions:
[
  {
    "name": "Local LM Studio",
    "vendor": "customendpoint",
    "apiType": "chat-completions",
    "models": [
      {
        "id": "google/gemma-4-e4b",
        "name": "Gemma 4 4B (chat-completions)",
        "url": "http://localhost:1234",
        "thinking": true,
        "streaming": true,
        "toolCalling": true,
        "vision": true,
        "maxInputTokens": 64000,
        "maxOutputTokens": 16000,
        "reasoningEffortFormat": "chat-completions",
        "supportsReasoningEffort": ["off", "on"]
      },
      {
        "id": "google/gemma-4-26b-a4b",
        "name": "Gemma 4 26B MoE (chat-completions)",
        "url": "http://localhost:1234",
        "thinking": true,
        "streaming": true,
        "toolCalling": true,
        "vision": true,
        "maxInputTokens": 100000,
        "maxOutputTokens": 50000,
        "reasoningEffortFormat": "chat-completions",
        "supportsReasoningEffort": [
          "none",
          "minimal",
          "low",
          "medium",
          "high",
          "xhigh"
        ]
      }
    ]
  }
]
You want to make sure that:
It has the correct
url.The
thinkingoption is set correctly (Gemma 4 supports it)supportedReasnongEffortis an array that depends on the model. The 26B version supports more granular control than the E4B version.
Do you remember the cold-start nuance I was talking about? That’s for loading the model to memory. The first prompt you send to the model is going to be very heavy as Copilot sends its own massive system prompt and tool definitions. This leads to 2-5 minutes delay on the very first interaction! ☠️
Pi doesn’t have this issue out of the box because the system prompt is tiny.
Just to give you an idea, loading the model takes 30 sec on my machine while processing the prompt input tokens takes around 5 minutes! Fortunately, this happens only once for every session because LM Studio respects prompt caching.
Cloud hosted AI providers seem to pre-cache the common prompts to give a snappy experience. Plus this is the part they can run in parallel on massive GPUs. For local workload we don’t have that luxury.
While waiting, you can open up LM Studio server settings and see the prompt processing in action. It almost feels like watching paint dry!
Alternatively you can find amusement in watching your GPU load go to 100% and generate heat:
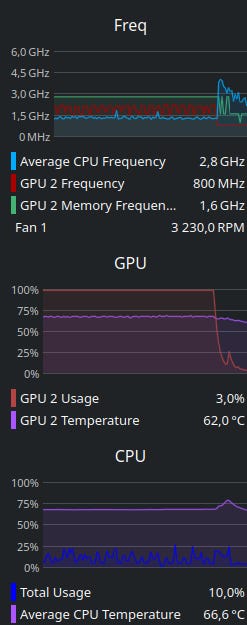
Tip: if you’re in the southern hemisphere now, you can use your local AI server as an ethical indoor heater! 🫠
Quick test
I did a one-shot prompt snake game (no AGENTS.md or SKILL) just to demonstrate what the Gemma 4 26B A4B is capable of:
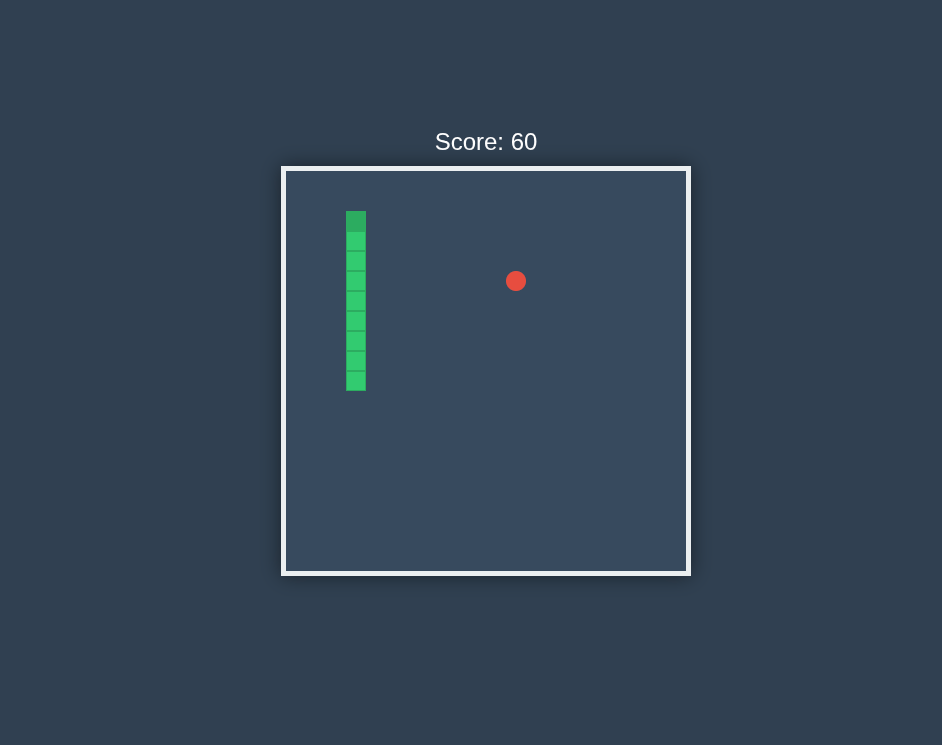
The entire prompt and source code are on Github.
My current setup:
Lenovo Thinkpad L16 Gen 2
AMD Ryzen 7 PRO 250 APU
64GB DDR5 - 5 600MT/s
Aurora Linux (atomic desktop based on Fedora)
Note: I feel lucky to get this machine for dirt cheap during black Friday! With the RAM price explosion, it costs double if I wanted to buy it today. However, I think 32GB is enough.
Pi setup
Telling Pi to use our local LM Studio server instead of an API server is just as easy.
One notable difference is the contextWindow setup which aligns better with how you configure LM Studio.
I don’t bore you repeating the official guide. Here’s my config:
{
  "providers": {
    "lm-studio": {
      "baseUrl": "http://host.containers.internal:1234/v1",
      "api": "openai-completions",
      "apiKey": "test",
      "models": [
        {
          "id": "google/gemma-4-e4b",
          "name": "Gemma 4 4B",
          "contextWindow": 64000,
          "maxTokens": 16000,
          "reasoning": true,
          "thinkingLevelMap": {
            "off": "off",
            "minimal":"on"
          }
        },
        {
          "id": "google/gemma-4-26b-a4b",
          "name": "Gemma 26B MoE",
          "input": ["text", "image"],
          "contextWindow": 150000,
          "maxTokens": 50000,
          "reasoning": true,
          "thinkingLevelMap": {
            "off": "none",
            "minimal":"minimal",
            "low":"low",
            "medium":"medium",
            "high":"high",
            "xhigh":"xhigh"
          }
        }
      ]
    }
  }
}
Recap
Before talking about using free models from OpenRouter, let’s recap the pros and cons of running local models for development workflows:
Pros:
Works offline
Higher privacy
Faster response time (depending on hardware, workflow complexity, model and config)
Cons:
Open weight models aren’t as smart as flagship proprietary models. However, a good harness with adequate guardrails (e.g. lints, tests, AGENTS.md, etc.) can significantly improve accuracy for coding workflows
Sluggish: if you run the LLM on the same machine you’re developing, you may notice slow-down when the hardware is busy processing inputs or generating tokens.
The cold-start
The initial prompt input processing (cache miss)
Higher initial hardware investment (many devs use Apple Mac computers with Apple Silicon inside, so it shouldn’t be a huge issue)
Although we use LM Studio, once you learn the lay of the land, you can skip the GUI and use the underlying Llama.cpp directly.
We used VS Code Copilot and Pi as examples but most other harnesses support custom endpoints which can work with local LLM.
Do you mind sharing this article on HackerNews in one click? 🙏
Free models on OpenRouter
OpenRouter is a unified API and routing service that exposes hundreds of models through a single endpoint and account.
BEFORE DOING ANYTHING: My first try with OpenRouter was a WTF moment! I hooked it to Pi emitting a simple “tell me a joke” prompt to see if the API Key is working. I picked Opus 4.6 because I wanted to see how much it costs! The joke was on me! 😆 Please read the instructions below to prevent an expensive mistake.
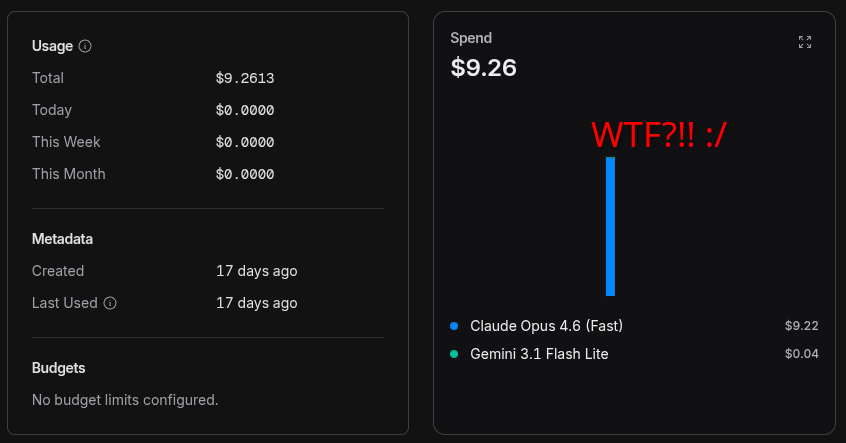
You do need to buy some credit to make your account functional.
Copilot, Zed and Pi all support OpenRouter naively. You just need to create an API token and give it to them.
If you put some money in your account, make sure to set a cap on your spending.
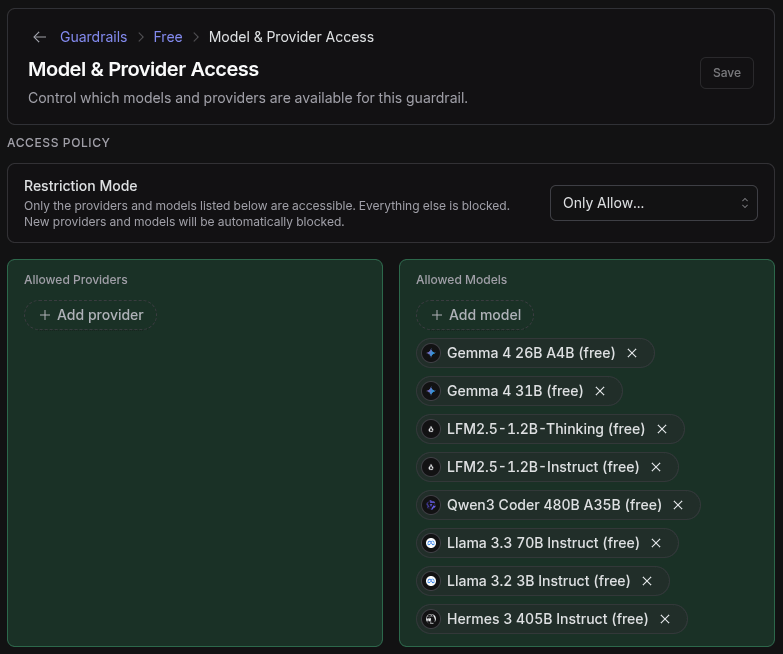
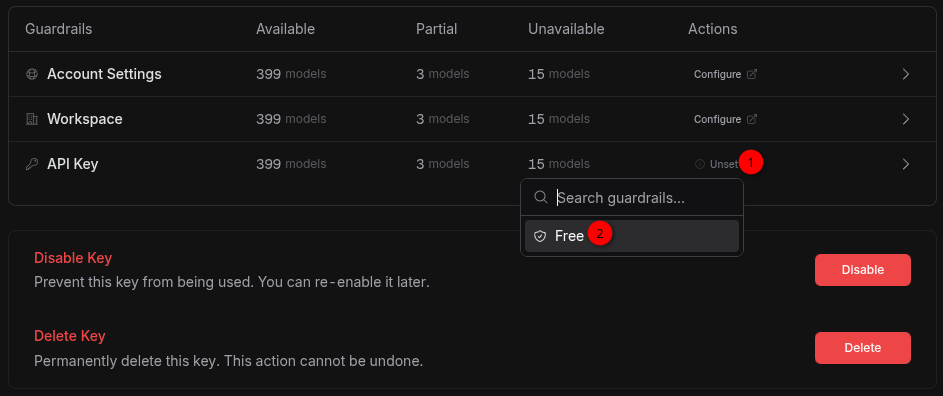
The best way to do that is to create a custom guardrail and put a $1/mo cap on it.

Then allow-list the free models:
When creating a new API key (to be used in Pi or Copilot or other harnesses), you have the option to set a max credit. Set it to 0.
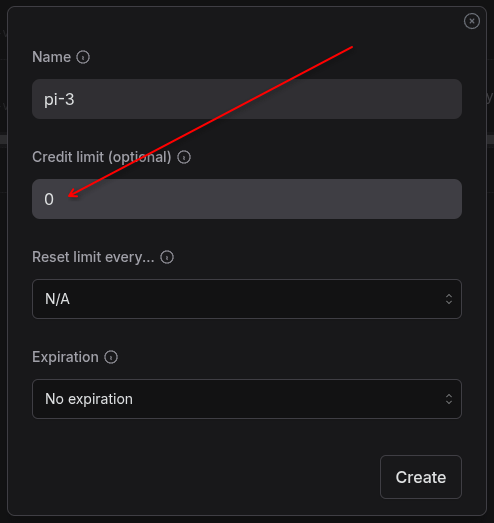
If you forgot, or want to change it, you can do that via your Key settings page:
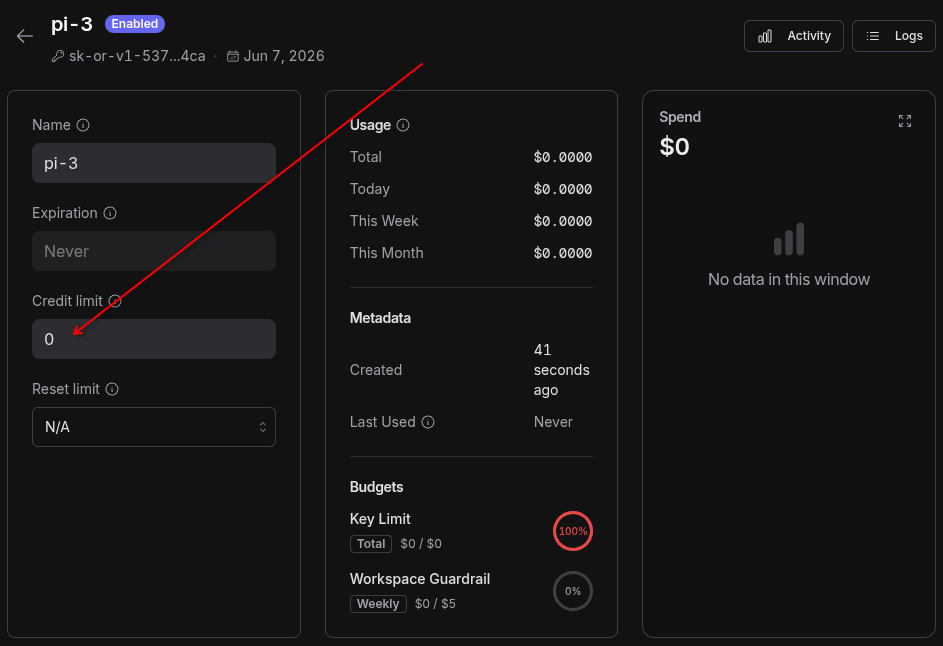
Then attach that custom guardrail to the API key you generated for LLM-assistance/agentic coding.
Of course, this comes with a few catches:
Your prompts and data may be used for training although there is a ZDR (Zero Data Retention) setting.
You need an internet connection.
OpenRouter may decide to stop serving free models just like the rest of the industry.
On the plus side, you don’t have to download and configure a model locally. Also, your computer doesn’t get sluggish while using the model.
Update 2026-06-09: I decided to use Deepseek V4 Pro which is almost as good as Claude Opus 4.8 with 5x the context window at ~17–86× cheaper price! 🤯 But I noticed Pi and OpenRouter have different ideas about the price (almost 3x more expensive on OpenRouter whereas their markup was supposed to be only 5.5%). After digging I realized OpenRouter is sending my requests to a more expensive endpoint (GMICloud) and that’s why it was more expensive. I opened an account on Deepseek and topped it up for dirt-cheap high capability model for complex tasks. For simpler tasks or when I care about understanding what’s going on behind the scene, or when privacy is important, local models are still my go-to.
My monetization strategy is to give away most content for free but these posts take anywhere from a few hours to a few days to draft, edit, research, illustrate, and publish. I pull these hours from my private time, vacation days and weekends. The simplest way to support this work is to like, subscribe and share it. If you really want to support me lifting our community, you can consider a paid subscription. If you want to save, you can get 20% off via this link. As a token of appreciation, subscribers get full access to the Pro-Tips sections and my online book Reliability Engineering Mindset. Your contribution also funds my open-source products like Service Level Calculator. You can also invite your friends to gain free access or save via a group subscription.
And to those of you who already support me, thank you for sponsoring this content for the others. 🙌 If you have questions or feedback, or you want me to dig deeper into something, please let me know in the comments.
Good read! Typo maxInputTokens -> maxOutputokens
when I tried Q8_0 for K cache and Q4_0 V cache, Gemma 4 26B A4B QAT failed to load. I've been running Q8_0 for both K and V cache settings for a while now and it seems solid, and much less RAM usage than the default F16